1편을 읽으신분은 다들 느끼셨겠지만 ElectronJS는 웹앱을 데스크톱앱으로 컴파일해주는 컴파일러에 더 가깝습니다. ReactJS를 잘 다루시는 분들은 1편만 보고도 ElectronJS에대한 이해도가 상당히 올라오셨을겁니다. 이번편에서 다룰 내용은 ReactJS를 웹에서 사용했을때와 ElectronJS로 컴파일해서 데스크톱앱으로 사용했을때 다른점인 “라우팅”과 ElectronJS 고유 기능들입니다.
먼저 라우팅을 시작해볼텐데 ReactJS를 웹으로 사용할때와 다른점은 필수적으로 HashRouter를 사용하셔야 한다는점입니다. 웹과 다르게 ElectronJS는 파일시스템 네비게이션을 통해 라우팅을 진행하기때문에 BrowserRouter는 사용할 수 없습니다.
이 튜토리얼에서는 아래 링크된 React Router를 사용해서 라우팅을 구현해보도록 하겠습니다.
먼저 필요한 모듈들을 설치하도록 하겠습니다. 프로젝트 루트에서 아래 커맨드를 실행해주세요.
yarn add @material-ui/core @material-ui/icons history @types/history react-router-dom react-router @types/react-router혹시 typescript에 대해 잘 모르시는 분들을 위해 약간의 설명을 드리면 @types/ 로 시작하는 패키지들은 Typescript 정의를 설치하는 패키지입니다.
먼저 라우팅 히스토리를 생성해보겠습니다. src 폴더 안에 service 폴더를 생성하고 그 안에 history.tsx 파일을 생성하고 아래 코드를 붙여넣어주세요.
import { createHashHistory } from 'history';

let hist = createHashHistory();

export default hist;
위에서 설명드린것처럼 createBrowserHistory 가 아닌 createHashHistory 를 사용해서 라우팅 히스토리를 생성해줍니다.
이어서 src 디렉터리에 page 디렉터리를 생성하고 IndexPage.tsx 파일을 생성후 아래 코드를 붙여넣도록 하겠습니다.
import React from 'react';
import Grid from '@material-ui/core/Grid';
import {makeStyles} from "@material-ui/core";
import Typography from "@material-ui/core/Typography";

const useStyles = makeStyles(theme => ({
    root: {
        height: '100vh',
    },
}));

export const IndexPage: React.FC = () => {
    const classes = useStyles();

    return (
        <Grid container className={classes.root}>
            <Typography variant="h1">메인 페이지입니다!</Typography>
        </Grid>
    )
};
Material UI에서 기본 제공되는 스타일링 시스템은 JSS를 바탕으로 한 자체 시스템입니다. makeStyles 함수로 클래스별 스타일링을 설정하고 해당 함수를 리엑트 컴포넌트에서 불러주면 React Hook 처럼 사용할 수 있습니다.
이제 src/index.tsx파일에 가서 코드를 아래처럼 변경해주겠습니다.
import React from 'react';
import ReactDOM from 'react-dom';
import './index.css';
import * as serviceWorker from './serviceWorker';
import {MuiThemeProvider, createMuiTheme} from "@material-ui/core";
import {App} from './App';

const theme = createMuiTheme({});

ReactDOM.render(
    <MuiThemeProvider theme={theme}>
        <App/>
    </MuiThemeProvider>,
    document.getElementById('root')
);

// If you want your app to work offline and load faster, you can change
// unregister() to register() below. Note this comes with some pitfalls.
// Learn more about service workers: https://bit.ly/CRA-PWA
serviceWorker.unregister();
Material UI를 사용하기 위해서는 위와같이 MuiThemeProvider 래퍼를 앱 최상단에 지정해주셔야합니다. tsconfig.json파일에 아래 코드를 추가해줍니다.
{
  "baseUrl": "src"
}
src 폴더를 소스 루트로 설정하는 코드로 앞으로 relative path가 아닌 absolute path를 사용할 수 있게 해줍니다.
이어서 src/App.tsx 파일을 아래와같이 변경해보겠습니다.
import React from 'react';
import logo from './logo.svg';
import './App.css';
import {IndexPage} from "page/IndexPage";

const App: React.FC = () => {
  return (
    <IndexPage/>
  );
};

export default App;
변경후 아래 커맨드 두개를 각각 다른 터미널에 실행해서 electron 앱을 시작해봅니다.
yarn react-start
yarn electron-start
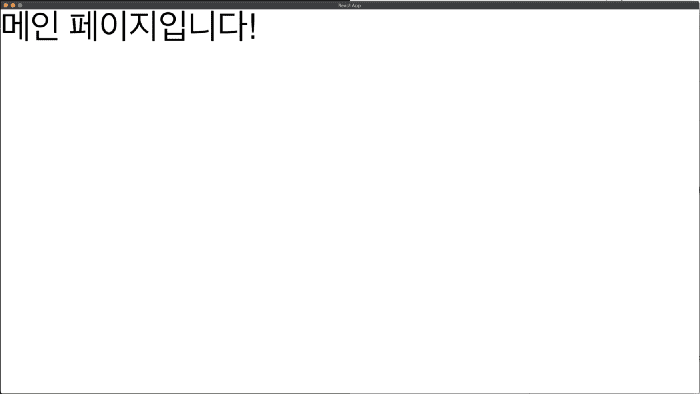
예상한대로 아래와같은 화면이 실행되는걸 볼 수 있습니다.
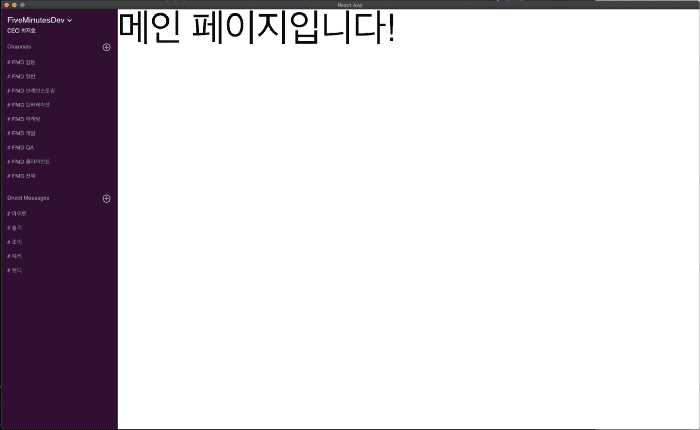
저희가 제작하려는 화면은 Slack을 대충 배낀 아래 화면입니다.
왼쪽에 있는 네비게이션을 클릭할때마다 오른쪽에 있는 화면의 라우트가 변경되도록 진행해보겠습니다. src/route/index.tsx 파일을 생성하고 아래 코드를 붙여넣도록 하겠습니다. (여기부터 어떤파일을 먼저 생성하냐에 따라 빨간줄이 좀 생기실수도 있어요. 마지막엔 모두 사라지니 끝까지 따라와주시고 혹시 길을 잃으시면 맨 밑에 연결해놓은 github 레포지토리를 참고해주세요)
import React from 'react';
import {
    IndexPage,
    ChannelPage,
    MessagePage,
} from 'page';

const channels = [
    {
        title:'FMD 임원',
        route: '/chiefs',
    },
    {
        title:'FMD 일반',
        route:'/general'
    },
    {
        title:'FMD 브레인스토밍',
        route:'/brainstorming',
    },
    {
        title:'FMD 오퍼레이션',
        route:'/operation',
    },
    {
        title:'FMD 마케팅',
        route: '/marketing',
    },
    {
        title:'FMD 개발',
        route:'/devs',
    },
    {
        title:'FMD QA',
        route:'/qa',
    },
    {
        title:'FMD 클라이언트',
        route:'/client'
    },
    {
        title:'FMD 전체',
        route:'/all'
    }
];

const messages = [
    {
        title:'아이린',
        route:'/irene',
    },
    {
        title:'슬기',
        route:'/seulgi',
    },
    {
        title:'조이',
        route:'/joy',
    },
    {
        title:'예리',
        route:'/yeri'
    },
    {
        title:'웬디',
        route:'/wendy',
    }
];

export const indexRoutes = [
    ...channels.map(
        item => ({
            route:item.route,
            title:item.title,
            exact:true,
            type:'channel',
            component:<ChannelPage title={item.title}/>
        })
    ),
    ...messages.map(
        item => ({
            route:item.route,
            title:item.title,
            exact:true,
            type:'message',
            component:<MessagePage title={item.title}/>
        })
    ),
    {
        route:'/',
        title:'메인',
        exact:true,
        type:'root',
        component:<IndexPage/>
    }
];
저희가 생성할 라우트들을 전부 정리한 파일입니다. src/component/sidebar/Sidebar.tsx 파일을 생성하고 아래 코드를 붙여넣도록 하겠습니다.
import React from 'react';
import Grid from '@material-ui/core/Grid';
import {makeStyles} from "@material-ui/core";
import List from '@material-ui/core/List';
import ListItem from '@material-ui/core/ListItem';
import ListItemText from '@material-ui/core/ListItemText';
import MenuItem from '@material-ui/core/MenuItem';
import Menu from '@material-ui/core/Menu';
import BottomArrow from '@material-ui/icons/ExpandMore';
import Typography from "@material-ui/core/Typography";
import Button from '@material-ui/core/Button';
import PlusIcon from '@material-ui/icons/ControlPoint';
import history from 'service/history';
import {indexRoutes} from "route";

const useStyles = makeStyles(theme => ({
    root: {
        height: '100vh',
    },
    drawer: {
        backgroundColor: '#350C35',
        height: '100%',
    },
    whiteText: {
        color: '#FFFFFF'
    },
    whiteIcon: {
        fill: '#FFFFFF'
    },
    greyText: {
        color: '#AEAEAE'
    },
    greyIcon: {
        color: '#AEAEAE'
    },
    categoryHeader: {
        marginTop: 20,
    },
    pageHeader: {
        padding: 20
    },
    bold: {
        fontWeight: 'bold'
    }
}));

export const Sidebar: React.FC = (props) => {
    const classes = useStyles();

    return (
        <List component="a" aria-label="nav-header">
            <ListItem
                button
                onClick={() => {
                    history.push('/');
                }}
            >
                <ListItemText primary={
                    <React.Fragment>
                        <Grid container alignItems="center">
                            <Typography variant="h6" className={classes.whiteText}>
                                FiveMinutesDev
                            </Typography>
                            <BottomArrow className={classes.whiteIcon}/>
                        </Grid>
                        <Typography variant="body2" className={classes.whiteText}>
                            CEO 최지호
                        </Typography>
                    </React.Fragment>
                }>
                </ListItemText>
            </ListItem>
            <ListItem
                button
                dense
                onClick={() => {
                }}
            >
                <ListItemText primary={
                    <Grid container justify="space-between">
                        <Typography variant="body2" className={classes.greyText}>
                            Channels
                        </Typography>
                        <PlusIcon className={classes.greyIcon}/>
                    </Grid>
                }/>
            </ListItem>
            {
                indexRoutes.filter(item => item.type === 'channel').map(item => {
                    return (
                        <ListItem
                            button
                            onClick={() => {
                                history.push(item.route)
                            }}
                            dense
                        >
                            <ListItemText primary={
                                <Typography variant="body2" className={classes.greyText}>
                                    # {item.title}
                                </Typography>
                            }/>
                        </ListItem>
                    )
                })
            }
            <ListItem
                button
                className={classes.categoryHeader}
                dense
                onClick={() => {
                }}
            >
                <ListItemText primary={
                    <Grid container justify="space-between">
                        <Typography variant="body2" className={classes.greyText}>
                            Direct Messages
                        </Typography>
                        <PlusIcon className={classes.greyIcon}/>
                    </Grid>
                }/>
            </ListItem>
            {
                indexRoutes.filter(item => item.type === 'message').map(item => {
                    return (
                        <ListItem
                            button
                            onClick={() => {
                                history.push(item.route)
                            }}
                            dense
                        >
                            <ListItemText primary={
                                <Typography variant="body2" className={classes.greyText}>
                                    # {item.title}
                                </Typography>
                            }/>
                        </ListItem>
                    )
                })
            }
        </List>
    )
};
Material UI 컴포넌트 API 정보는 아래 링크에 가면 상세하게 보실 수 있습니다.
위 코드에서는 저희가 정의해놓은 라우트들을 message type과 channel type별로 구분해서 버튼형태의 리스트를 만드는 코드입니다. 추가적으로 버튼을 클릭할때마다 src/route/index.tsx 파일에서 정의해놓은 라우트로 이동하도록 하였습니다.
src/page 폴더에 두개의 페이지들을 더 생성해보도록 하겠습니다. MessagePage.tsx 파일을 생성해주고 아래 코드를 붙여넣어주세요.
import React from 'react';

interface MessagePageProps {
    title:string;
}

export const MessagePage : React.FC<MessagePageProps> = (props)=>{
    return (
        <div>
            Message Page 제목 : {props.title}
        </div>
    )
};
ChannelPage.tsx에는 아래 코드를 입력해주세요.
import React from 'react';

interface ChannelPageProps{
    title:string;
}

export const ChannelPage : React.FC<ChannelPageProps> = (props) => {
    return (
        <div>
            Channel Page 제목 : {props.title}
        </div>
    )
};
각 페이지별로 페이지의 이름과 src/route/index.tsx에서 지정한 타이틀을 보여주는 코드입니다.
스크린을 한번에 export 할 수 있도록 src/page/index.tsx 파일을 생성해주시고 아래 코드를 복붙해주세요.
export * from './IndexPage';
export * from './ChannelPage';
export * from './MessagePage';
이제 실제 라우팅을 적용할 차례입니다. src/App.tsx 파일을 아래 코드로 교체해주세요.
import React from 'react';
import logo from './logo.svg';
import './App.css';
import Grid from '@material-ui/core/Grid';
import {IndexPage} from 'page';
import history from "service/history";
import {Route, Router, Switch} from "react-router";
import {indexRoutes} from "route";
import {Sidebar} from "component/sidebar/Sidebar";
import {makeStyles} from "@material-ui/core";

const useStyles = makeStyles(theme => ({
    root: {
        height: '100vh',
    },
    drawer: {
        backgroundColor: '#350C35',
        height: '100%',
    },
}));

export const App: React.FC = () => {
    const classes = useStyles();

    return (
        <Router history={history}>
            <Switch>
                {/*
                저희가 정의해놓은 라우트를 여기서 실제 라우트 컴포넌트로 전환합니다.
                왼쪽으 사이드바는 어떤 라우트던 고정으로 사용되고
                item.component 부분만 src/route/index.tsx에서 지정해놓은
                컴포넌트로 다이나믹하게 렌더링을 합니다.
                */}
                {indexRoutes.map((item, key) => {
                    return (
                        <Route path={item.route} exact={item.exact}>
                            <Grid container className={classes.root}>
                                <Grid item xs={2} className={classes.drawer}>
                                    <Sidebar/>
                                </Grid>
                                <Grid item xs={10}>
                                    {item.component}
                                </Grid>
                            </Grid>
                        </Route>
                    )
                })}
            </Switch>
        </Router>
    );
};
마지막으로 src/index.tsx를 아래처럼 교체해보겠습니다.
import React from 'react';
import ReactDOM from 'react-dom';
import './index.css';
// 아래부분을 바꿔주세요
import {App} from './App';
import * as serviceWorker from './serviceWorker';

ReactDOM.render(<App />, document.getElementById('root'));

// If you want your app to work offline and load faster, you can change
// unregister() to register() below. Note this comes with some pitfalls.
// Learn more about service workers: https://bit.ly/CRA-PWA
serviceWorker.unregister();
App.tsx를 불러오는 부분 한줄만 바뀌었습니다.
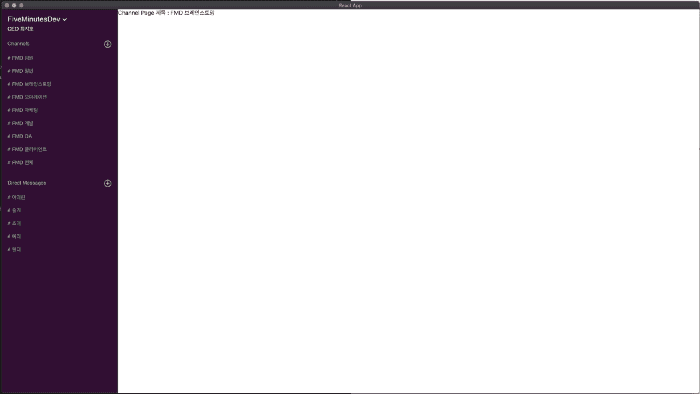
터미널에서 실행했던 react 와 electron을 모두 종료하고 위에서 했던대로 둘다 다시 시작해주면 아래와같은 화면을 보실 수 있습니다.
왼쪽의 버튼들을 누르시면 저희가 지정한 라우트로 오른쪽 화면이 이동하는걸 보실 수 있습니다. 이로서 React로 ElectronJS 기본적인 라우팅하기는 완료되었습니다. Private Route등 더욱 복잡한 라우팅도 React 앱에서 하시던대로 사용하시면 되겠습니다.
마지막으로 ElectronJS의 고유기능 몇가지 사용법을 알려드리겠습니다. ReactJS에서 Electron API를 사용하려면 런타임에 글로벌 electron 변수를 끌어와야 합니다. src/component/sidebar/Sidebar.tsx를 아래로 변경하겠습니다.
import React from 'react';
import Grid from '@material-ui/core/Grid';
import {makeStyles} from "@material-ui/core";
import List from '@material-ui/core/List';
import ListItem from '@material-ui/core/ListItem';
import ListItemText from '@material-ui/core/ListItemText';
import MenuItem from '@material-ui/core/MenuItem';
import Menu from '@material-ui/core/Menu';
import BottomArrow from '@material-ui/icons/ExpandMore';
import Typography from "@material-ui/core/Typography";
import Button from '@material-ui/core/Button';
import PlusIcon from '@material-ui/icons/ControlPoint';
import history from 'service/history';
import {indexRoutes} from "route";

const electron = window.require("electron");
const {shell, clipboard} = electron;
const {dialog} = electron.remote;

const useStyles = makeStyles(theme => ({
    root: {
        height: '100vh',
    },
    drawer: {
        backgroundColor: '#350C35',
        height: '100%',
    },
    whiteText: {
        color: '#FFFFFF'
    },
    whiteIcon: {
        fill: '#FFFFFF'
    },
    greyText: {
        color: '#AEAEAE'
    },
    greyIcon: {
        color: '#AEAEAE'
    },
    categoryHeader: {
        marginTop: 20,
    },
    pageHeader: {
        padding: 20
    },
    bold: {
        fontWeight: 'bold'
    }
}));

export const Sidebar: React.FC = (props) => {
    const classes = useStyles();

    return (
        <List component="a" aria-label="nav-header">
            <ListItem
                button
                onClick={() => {
                    history.push('/');
                }}
            >
                <ListItemText primary={
                    <React.Fragment>
                        <Grid container alignItems="center">
                            <Typography variant="h6" className={classes.whiteText}>
                                FiveMinutesDev
                            </Typography>
                            <BottomArrow className={classes.whiteIcon}/>
                        </Grid>
                        <Typography variant="body2" className={classes.whiteText}>
                            CEO 최지호
                        </Typography>
                    </React.Fragment>
                }>
                </ListItemText>
            </ListItem>
            <ListItem
                button
                dense
                onClick={() => {
                }}
            >
                <ListItemText primary={
                    <Grid container justify="space-between">
                        <Typography variant="body2" className={classes.greyText}>
                            Channels
                        </Typography>
                        <PlusIcon className={classes.greyIcon}/>
                    </Grid>
                }/>
            </ListItem>
            {
                indexRoutes.filter(item => item.type === 'channel').map(item => {
                    return (
                        <ListItem
                            button
                            onClick={() => {
                                history.push(item.route)
                            }}
                            dense
                        >
                            <ListItemText primary={
                                <Typography variant="body2" className={classes.greyText}>
                                    # {item.title}
                                </Typography>
                            }/>
                        </ListItem>
                    )
                })
            }
            <ListItem
                button
                className={classes.categoryHeader}
                dense
                onClick={() => {
                }}
            >
                <ListItemText primary={
                    <Grid container justify="space-between">
                        <Typography variant="body2" className={classes.greyText}>
                            Direct Messages
                        </Typography>
                        <PlusIcon className={classes.greyIcon}/>
                    </Grid>
                }/>
            </ListItem>
            {
                indexRoutes.filter(item => item.type === 'message').map(item => {
                    return (
                        <ListItem
                            button
                            onClick={() => {
                                history.push(item.route)
                            }}
                            dense
                        >
                            <ListItemText primary={
                                <Typography variant="body2" className={classes.greyText}>
                                    # {item.title}
                                </Typography>
                            }/>
                        </ListItem>
                    )
                })
            }
            <ListItem
                button
                className={classes.categoryHeader}
                dense
                onClick={() => {
                }}
            >
                <ListItemText primary={
                    <Grid container justify="space-between">
                        <Typography variant="body2" className={classes.greyText}>
                            Electron API
                        </Typography>
                        <PlusIcon className={classes.greyIcon}/>
                    </Grid>
                }/>
            </ListItem>
            <ListItem
                button
                onClick={() => {
                    shell.openExternal('https://github.com');
                }}
                dense
            >
                <ListItemText primary={
                    <Typography variant="body2" className={classes.greyText}>
                        # 브라우저 열기
                    </Typography>
                }/>
            </ListItem>
            <ListItem
                button
                onClick={() => {
                    clipboard.writeText('# 글자 복사하기');
                }}
                dense
            >
                <ListItemText primary={
                    <Typography variant="body2" className={classes.greyText}>
                        # 글자 복사하기
                    </Typography>
                }/>
            </ListItem>
            <ListItem
                button
                onClick={() => {
                    dialog.showOpenDialog({ properties: ['openFile', 'multiSelections'] })
                }}
                dense
            >
                <ListItemText primary={
                    <Typography variant="body2" className={classes.greyText}>
                        # 파일 선택하기
                    </Typography>
                }/>
            </ListItem>
        </List>
    )
};
추가적으로 public/Main.js 파일을 아래처럼 변경합니다. 변경된 부분은 주석처리 하였습니다.
const {app, BrowserWindow} = require('electron');
const path = require('path');
const url = require('url');

function createWindow() {
    /*
    * 넓이 1920에 높이 1080의 FHD 풀스크린 앱을 실행시킵니다.
    * */
    const win = new BrowserWindow({
        width:1920,
        height:1080,
        // 여기가 바뀌었어요!
        // nodeJS API를 사용 가능하게하는 코드입니다.
        webPreferences: {
            nodeIntegration: true,
        }
    });

    /*
    * ELECTRON_START_URL을 직접 제공할경우 해당 URL을 로드합니다.
    * 만일 URL을 따로 지정하지 않을경우 (프로덕션빌드) React 앱이
    * 빌드되는 build 폴더의 index.html 파일을 로드합니다.
    * */
    const startUrl = process.env.ELECTRON_START_URL || url.format({
        pathname: path.join(__dirname, '/../build/index.html'),
        protocol: 'file:',
        slashes: true
    });

    /*
    * startUrl에 배정되는 url을 맨 위에서 생성한 BrowserWindow에서 실행시킵니다.
    * */
    win.loadURL(startUrl);

}

app.on('ready', createWindow);
electron과 react를 모두 껏다 다시 실행하시면 왼쪽 아래에 세개의 버튼이 더 생성된걸 보실 수 있습니다. 런타임에 electron 함수를 불러와서 electron에서 제공하는 API를 사용해 브라우저를 여는법, 글자 복사하는법, 파일 선택하는법 세가지를 데모로 제공해드렸습니다. 똑같은 개념으로 electron 다큐멘테이션을 보면서 필요하신 Electron API를 구현하시면 되겠습니다. 여기까지 따라오시느라 고생하셨습니다.


